You need:
- Cardstock 300gsm
- Scissors
- Border punch
- Ink
- Glue
- Double-sided tape
- Scrapbooking paper
- Wadding
- White gesso
Potrebujemo:
- foto karton 300gsm
- škarje
- luknjač
- barvna blazinica
- lepilo
- obojestranski selotejp
- design papir
- sanitetna vata
- gesso beli
BOTTOM PART OF THE CAKE
Step 1
Cut two equal circles from the cardstock 13 cm.
SPODNJI DEL TORTE
1. korak
Iz kartona izrežemo dva enako velika kroga 13 cm.
Step 2
Now you need to cut a strip of cardstock to create our cake box. The width of this cardstock strip depends on how high you want the cake to be. I want my cake to be 7 cm high, so my strip is 9 cm wide.
2. korak
Iz kartona izrežemo trak, ki je obod torte. Višino prilagodimo: ali želimo višjo ali nižjo torto. V tem primeru je višina 7 cm. Odrežemo 9 cm širok trak, dolžino prilagodimo obsegu kroga.
Step 3
Score your cardstock at 2 cm and fold the scoring line with your bone folder.
3. korak
Na traku naredimo utor pri 2 cm in ožji del prepognemo.
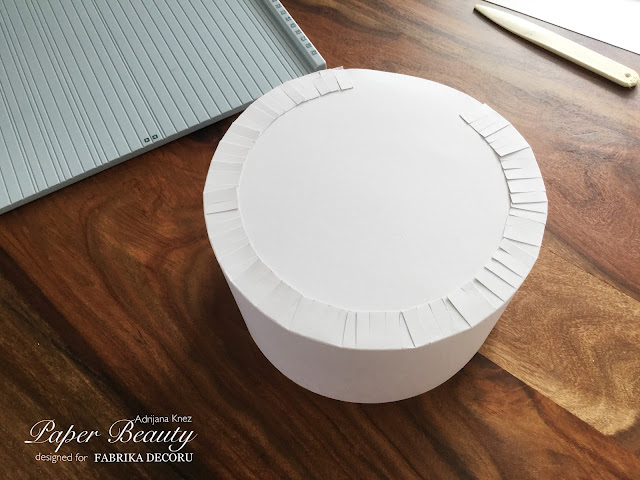
Step 4
Take your scissors and cut small strips on the folded part every 5 mm - 7 mm to the scoring line.
4. korak
Na ožjem delu po celi dolžini traka naredimo zareze do pregiba in sicer pribl. na vsakih 5mm - 7 mm.
Step 5
Take one of your circles and glue the small stripes on the circle. You can use strong liquid adhesive or glue gun.
5. korak
Trak z zarezami prilepimo na en krog. Lepimo s tekočim lepilom, lahko pa si pomagamo tudi s silikonsko pištolo.
Step 6
Glue the second circle to the bottom of our cake to hide the stripes. The bottom part is finished.
6. korak
Tako smo dobili obliko torte. Drugi krog prilepimo na dno, kjer so vidne zareze in jih skrijemo.
MAKE THE LID
Step 7
Again cut two equal circles that are slightly bigger than you bottom circles – aprox. 3 mm bigger. Cut a stripe of cardstock that is 5 cm wide, the lenght depends on your circle size. Score the stripe at 2 cm and fold. On the wider side use your favorite border punch to create a border. I used Martha Stewart punch to get this beautiful lace border.
IZDELAVA POKROVA
7. korak
Spet izrežemo dva kroga in sicer malenkost večja kot je dno torte - pribl. 3 mm več. Odrežemo 5 cm širok trak, dolžino prilagodimo krogu. Utor naredimo na 2 cm in prepognemo. Na širšem delu traku uporabimo poljubni luknjač. Jaz sem uporabila Martha Stewart čipka luknjač.
Step 8
Now repeat the process from step 5. Cut small stripes and glue the piece of cardstock to the circle. And cover the stripes with the other circle.
8. korak
Trak prilepimo na krog na enak način kot v 5. koraku. Drugi krog prilepimo tako, da skrijemo zareze.
Step 9
If you wish you can make a smaller cake for two level cake with the same steps. Cover the cake with beautiful scrapbooking paper. I used this new and beautiful Fabrika Decoru scrapbooking papers from collection »My little baby girl«.
9. korak
V 9. koraku po želji naredimo še manjšo tortico, ki jo izdelamo na enak način kot večjo.
Oba oboda torte "oblečemo" v potiskan papir. V tem primeru sem uporabila nove, čudovite papirje Fabrika Decoru kolekcija "My little baby girl."
Step 10
Glue the smaller cake on the lid of the bigger cake with glue gun. Try to center the smaller cake on the lid.
10. korak
Majhno torto s silikonsko pištolo pritrdimo na pokrov večje torte. Pri tem pazimo, da je v sredini pokrova.
DECORATE THE CAKE
Step 11
Use liquid glue to adhere the wadding to the lid of the bigger cake. Spritz the wadding with water andadd white gesso. If the wadding is a litttle bit wet, than the gesso sticks better. When the gesso is still wet sprinkle over white glitter, to get the effect of snow.
OKRASITEV TORTE
11. korak
Na spodnji del torte s tekočim lepilom prilepimo vato. Nato vato poškropimo z vodo in nanjo previdno nanesemo beli gesso. Če je vata rahlo vlažna, se gesso lažje prime. Na moker gesso previdno posipamo bale bleščice, da dobimo videz snega.


Ni komentarjev:
Objavite komentar